
BACKGROUND: Amazon Echo devices can be paired with Amazon Fire Sticks. This achieves voice commands that lets you voice control displaying security cameras, searching for Amazon video content, and launching applications on the Fire Stick like YouTube. If the device that is paired with the Amazon Fire Stick is an Echo Show, then it is necessary to say “show me the front door camera on the Fire TV” because without the “Fire TV” directive, the camera is displayed on the Echo Show.
PROBLEM: Newer televisions like the Samsung QLED models are HDMI-CEC compatible. “CEC” means Consumer Electronics Control which is a feature of HDMI designed to allow users to command and control devices connected through HDMI using only a single remote control. The Amazon Fire TV stick is an HDMI-CEC device also. If content is being viewed on the Samsung QLED TV such as a live broadcast, and a voice command is issued to view a camera, the HDMI input on the TV is immediately switched from the TV tuner to the HDMI input where the Fire TV is connected and the Fire TV is displayed in order to show the camera.
This is the desired behavior. The problem occurs when you are finished viewing the camera and you want to switch back to your previous content. There is no HDMI-CEC methodology to determine what the previously active HDMI input was. Also, not all devices in a typical entertainment center are HDMI-CEC compatible. In my “use case” my HDMI inputs include the QLED TV, the Amazon Fire Stick 4K, a Roku, a PS3, an HD-DVD Player, a Raspberry Pi running OSMC, and a VCR.
SOLUTION:
My control mechanism is a Logitech Harmony Hub. My home automation control is managed by a Samsung SmartThings Hub. SmartThings is running the “Logitech Harmony (Connect)” SmartApp. The Logitech Harmony defines a subset of electronic components and their connection to each other as an “Activity”. Commonly defined activities include “Watch TV”, “Watch Roku” or “Watch Fire TV”. In addition, be sure you have the “Harmony Hub” Alexa skill enabled, because it provides the ability to change Harmony activities by voice.
Samsung SmartThings becomes very powerful when paired with the WEB based Community’s Own Rule Engine (WEBCore). WEBCore allows for complex programs to be written using devices and sensors controlled and monitored by SmartThings. The limitation on being able able to return to the proper HDMI input after viewing a camera is that HDMI-CEC has grabbed the input from whatever was being watched.
Fortunately, the Harmony Hub knows what “Activity” is in progress and the HDMI-CEC control that switched the input to the Fire TV Stick is not even known by the Harmony Hub. The downside is that the “Logitech Harmony (Connect)” SmartApp is limited being able to query what activity is underway, starting an activity, or ending an activity. Assuming you are watching the over the air TV and then you voice command a camera to be displayed, your activity is still “Watch TV”, but your input has been switched to the Fire Stick and the Harmony remote buttons represent the TV controls and not the Fire Stick controls.
The way to fix this would be to choose the Fire Stick activity on your Harmony Remote and then choose the Watch TV activity on the Harmony remote and you would be back to where you started. This is needlessly complex and a convoluted approach to achieve a simple ends.
The simple approach would be to create a voice command named “Return” that would return from the camera to what you were watching. The problem is that although the “Logitech Harmony (Connect)” SmartApp manages activities very well, it does not manage sending individual commands to an entertainment system component such as the Samsung TV.
IMPLEMENTATION:
To overcome this limitation, we must have individual device control. Logitech has a Harmony Hub Application Programming Interface (API). The Harmony API does allow for direct control of devices connected through the hub. In December of 2018 Harmony released a firmware update that addressed several security vulnerabilities, including disabling access to the API. The primary reason for this was that Harmony integration to 3rd party Internet of Things (IoT) including Smart Door Locks. By February, 14th 2019 Harmony decided to make enabling the API an option that could be activated on a per Hub basis through the user mobile app. This API is the foundation of this solution.
In order to enable the API, you enter the “Harmony” app on your phone. Select your desired hub. Go into the menu and choose “Harmony Setup” and go to “Add/Edit Devices & Activity”. Choose “Remote & Hub” and finally “Enable XMPP (Developer Option)”. The API must be initiated from a computer on your local network and cannot be a cloud initiated interface. Jon Maddox has created a simple server that can run this API locally on your network.
It’s possible to implement this API in many ways, but I simply downloaded the “jonmaddox/harmony-api:latest” Docker image and I am running it on my QNAP NAS on a unique address of 172.16.1.3. The API communicates on TCP port 8282. You need to make sure you statically address the Harmony API Server.
A SmartThings Community programmer by the name “turlvo” has created a SmartApp with several custom device handlers which add device control for Harmony. The documentation for this installation is here:
The best way to get the Smartapp and the device handlers for Kuku Harmony configured is to define his gitHub repository by going into “settings” in the SmartThings IDE:
https://graph.api.smartthings.com/ide/apps
Click on “settings” and add a new repository. The owner should be “turlvo” and the Name is “KuKuHarmony” and branch is “master”. Now click “Update from Repo” and choose KukuHarmony. Make sure and publish the SmartApp. You will have to do the update once for the SmartApp and once for the device handlers. There are five (5) device handlers for this SmartApp. Defining them through the repository helps you easily manage updates.
Proceed to the SmartThings Classic mobile app and select Marketplace and then SmartApps. Choose “My Apps” and you should see Kuku Harmony in the list. Choose it and you should be able to specify the IP address of the server running the API on your network that we created above. Once that is done, save and enter the SmartApp again. Your Harmony Hub should then be listed as long as you had “Enable XMPP (Developer Option)” from the instructions above. Once that is completed, you can choose “Add a device”. All the devices configured on the selected hub should be listed.
I selected my “Samsung TV” because that is the device that has its HDMI input port being changed via the HDMI-CEC protocol by the Amazon Fire Stick. I then was able to define that the “Samsung TV” was type “TV” (that controls the device type handler choice) and then it will list commands. Define any commands you want in that section.
In this case, I defined “Input” to be “InputTV”. On my TV InputTV is the input for the over the air tuner. Next I defined “Custom1” to be “InputHdmi2” which is where my Roku is plugged in.
Now I went to the SmartThings IDE and defined a virtual switch that I named “Return_To_TV”. I added that switch to the SmartThings “Alexa” SmartApp as a switch to be recognized and I added the same switch to the “Webcore” SmartApp. I also added the new device named “Samsung TV” that KuKuHarmony created to Webcore. I also made sure that my “Watch TV” activity and my “Watch Roku” activity were defined in the Webcore SmartApp as devices to be controlled. You also must add the “Logitech Harmony (Connect)” device name for your Harmony Hub to Webcore.
I created a Webcore piston to control these devices. Important note: Although “Logitech Harmony (Connect)” can turn activities on and off, in order to know their current state, you must point to your hub and tell it to refresh and wait one or two seconds so that it will know which activity is active. Here’s the piston:
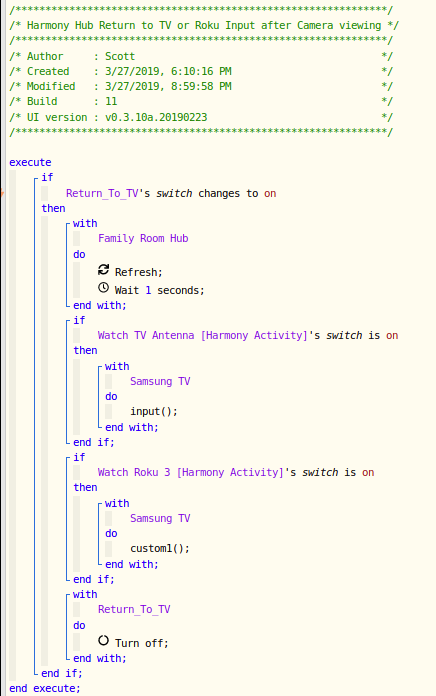
One final step is to go into the “Alexa” app and create a “Routine” that accepts the spoken prompt “Return” and turns on the virtual switch “Return_To_TV”.
OPERATION:
You will now be able to be watching a show on live TV and say “Alexa, show me the Front Door Camera” and HDMI-CEC will take over on your Amazon Fire Stick and switch to its input and display the camera. When you say “Alexa, Return” the above piston will switch back to your TV. The same is true if you are watching on Roku and display a camera. You can add code segments to the piston above for other activities you may have as well. If you are already watching something on the Fire Stick and you display a Camera, you can simply say “Tell Harmony to continue” and the Harmony Alexa skill will go back to the show you were watching.
Hope this guide helps automate your camera viewing on the Fire Stick via Alexa.