CT101 Thermostat quasi-unresponsive


#1

1) Give a description of the problem
I am trying to build up my own thermostat piston. Device is a CT101 which is paired to my v2 hub and appears to work fine when manually changing the mode or setpoints. But webcore does not appear to be able to make changes to the device. I have created 2 simulated buttons (here they are called keypad 1 & keypad 2, but in reality ‘colder’ and ‘hotter’). I went this route because I eventually want custom Alexa responses to “it’s hot in here” or “it’s cold in here” and I believe it will need to virtually press the virtual buttons.

In any case, if I press the button through the app, the button press is registered and it tells me that it is carrying out the actions. But if I go back to the thermostat device (or look in the API) I can see that the setpoints are not changed. (see log below)

Finally, if instead of using the lower__Setpoint(2) or raise__Setpoint(2) action I use a variable and an expression which evaluates the current setpoint and then adds 2, the expression evaluates as 0, as if each of the setpoints is 0.

I need this basic piston logic to work before I go adding additional logic or sensor inputs from the doors & windows. Please help.

2) What is the expected behavior?
Expected behavior is to change the temperature setpoints.

3) What is happening/not happening?
Setpoints are not changing despite “executed” in the log.

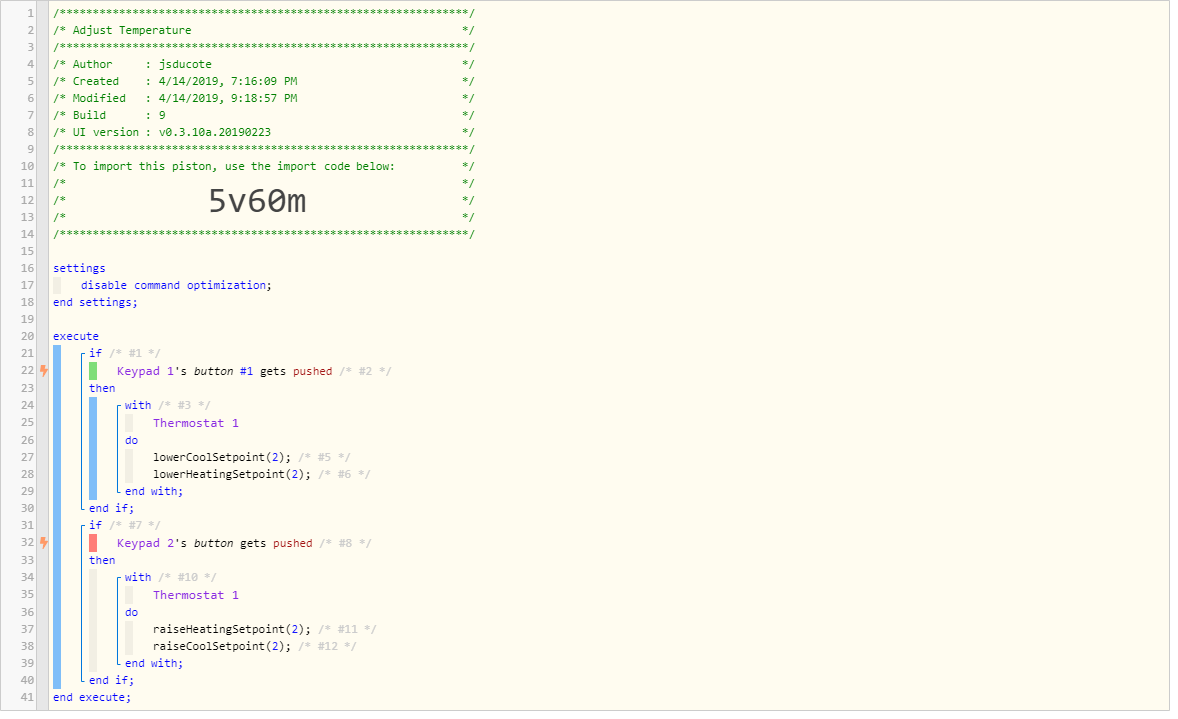
**4) Post a Green Snapshot of the piston![image|45x37]

5) Attach any logs (From ST IDE and by turning logging level to Full)
( 4/14/2019, 9:37:38 PM +954ms
+1ms ╔Received event [Colder].button = pushed with a delay of 53ms
+70ms ║RunTime Analysis CS > 13ms > PS > 43ms > PE > 14ms > CE
+73ms ║Runtime (38564 bytes) successfully initialized in 43ms (v0.3.10a.20190223) (70ms)
+74ms ║╔Execution stage started
+84ms ║║Comparison (enum) pushed gets (string) pushed = true (1ms)
+86ms ║║Condition #2 evaluated true (6ms)
+87ms ║║Condition group #1 evaluated true (state did not change) (8ms)
+90ms ║║Cancelling statement #3’s schedules…
+214ms ║║Executed physical command [Thermostat].lowerCoolSetpoint([2]) (117ms)
+215ms ║║Executed [Thermostat].lowerCoolSetpoint (119ms)
+242ms ║║Executed physical command [Thermostat].lowerHeatingSetpoint([2]) (22ms)
+243ms ║║Executed [Thermostat].lowerHeatingSetpoint (24ms)
+253ms ║║Condition #8 evaluated false (7ms)
+254ms ║║Condition group #7 evaluated false (state did not change) (8ms)
+257ms ║╚Execution stage complete. (184ms)
+258ms ╚Event processed successfully (258ms))


#2

If you want Alexa to adjust the temp, I would not use Simulated Buttons…

  • If you want on/off capabilities, then Simulated Switches are the way to go
  • If you want single press only, then Momentary Button Tiles are the way to go

Also, it is unfortunate, but most thermostats are slow to respond, and even slower to update SmartThings to any changes. If this is your first foray into programming for your thermostat, I would start very simple with only a single command. Once you have a single command working, you may have to insert a (fairly long) delay before sending a second command, but there is no point in working on two commands until you get the first command to react appropriately.

Just my two cents.


#3

I’ll take a look at momentary button tiles, but for the record, there isn’t really any delay between smartthings and the thermostat. If I go to the thermostat device in the smartthings app and manually (as described in the problem above) change either of the setpoints, then it changes within a half-second to a second. The problem is having webcore attempt to change a setpoint. It tells me it has executed, but this is a LIE since I can see very clearly that neither setpoint changed.


#4

This is good. It means that webCoRE will be just as fast.
(just be aware that there may be delay when going the other direction. IE: Thermostat updating ST)


This tells me that you are not using the correct syntax in your piston. Unfortunately, I do not own that device to tell you the correct syntax. I still recommend editing your piston to only a single command until you find which commands (and parameters) work for your device.


The “executed” you see in the logs means that your command was successfully sent. It does not mean that you sent a valid command, or that the device reacted the way you want it to.


#5

I don’t follow you. The syntax is written by webcore, not by me. I select the ‘do’ action (and parameters) from the options given to me by webcore. Those choices are defined by the DTH and DH, both of which are built-in functionality and not something that I created out of thin air. Could you be more specific in how I’m doing something wrong?

Then this is a problem with webcore not using the english language correctly. If it means to say that a command was sent to a device, it should say that a command was sent to a device.


#6

If you are using a “built-in” Device Handler, then it is likely because webCoRE is programmed for hundreds of different devices. Not all commands work with all devices. (which is why I am recommending testing with only a single command until you find the right one for your device)

If you are using a “customized” Device Handler, then I usually go to the discussion board for that DH to better understand the way that it was programmed, and the best use cases.


As far as your other concern, you are right. The choice of words is not perfect in the log. I guess the logic is if any device reports back to the piston on a status update, it will be shown in the log. Otherwise, the executions simply means that webCoRE did what was asked of it.


To be fair, how could webCoRE know if the device on the other end did what it was told to do unless it reported back?

IE:
Tell daughter to do homework

+215ms ║║Executed [Daughter].homework

… but this does not mean that her homework actually got done, LOL


#7

I have the ct-101 and I had similar responsiveness issues. I found insertion of a 1 sec delay between commands helped but did not work 100%. I haven’t have been out of town so haven’t been able to play with it further but believe it responded well when I put a delay after each command. Still not sure if it will be consistent yet.


#8

Which Device Handler are you using @guxdude?
Do you know if these commands work with your device?

lowerCoolSetpoint(2)
raiseCoolSetpoint(2)

lowerHeatingSetpoint(2)
raiseHeatingSetpoint(2)

#9

I was able to work on it last night. Those commands do not work (which is frustrating that webcore would even offer them to me) but Set cooling point and Set heating point do appear to work, so I’m in business with the following …

And switches 13 and 14 are now ‘momentary button tiles’ so that Alexa can discover them. She’s already been told how to respond to voice commands (4) like “I’m hot” or “It’s cold in here”.
Thanks for your help.


#10

I can understand your frustration, but I think this is better than the alternative where we only get one or two options. I much prefer having a ton of options, and it being up to the user to learn what commands work for their specific device. (there does not seem to be a standard in Smart Home devices yet)

I am glad you got it all working!!!


#11

If I was using a generic device handler, I’d agree that it’s on me. But I’m using one that webcore identifies as specific to my make & model of thermostat. I imagine it was largely copied from some other device, but they left in vestigial commands. I would have preferred they tested and removed them before publishing.


#12

Is this a device handler that you manually installed yourself?


#13

No. Upon pairing with my hub, it was automatically identified (correctly) by its fingerprint deviceid.


#14

Oh, then that is a Device Handler that SmartThings has deemed appropriate for your device. I believe that most (all?) Device Handlers are meant to work with more than one device/model number… So there is almost always extra code in place for similar devices.

If there is certain functionality that is not available for your specific device, it might be worth seeking out a device handler that is made for your exact device (if it exists).


#15

fingerprint mfr:“0098”, prod:“6501”, model:“000C”, deviceJoinName: “Radio Thermostat CT101”

This is the specific device.

But I think I might have figured it out. I’m not a programmer, but I can hack my way through a bit of code if necessary. What I think is happening is that the raiseheatingsetpoint command, for example, is there in the HD to present the tile on the device in the app which is a momentary push to raise the heatsetpoint. When pressed, it calls a subroutine which is not intended to take any arguments, merely to raise the setpoint one degree per press. When I called that subroutine directly from my piston, because webcore allowed me to, I was sending the argument “2” along with it which, instead of being ignored, disrupted the ability of this subroutine from functioning. Webcore doesn’t know that you’re not supposed to send arguments, not its fault. Technically mine, although I had no way of knowing that you’re not supposed to call it directly, let alone send parameters. If my original piston above had not sent a parameter, it might have worked. It just wouldn’t have worked the way I want, 2 degrees at a time as opposed to 1. Too late now, I got it just the way I want it and am quitting while I’m ahead.


#16

Oh, but yes, there is one other device (same mfr, older model) that is intended to work with this DH.


#17

I also just used the default handler when I first installed the thermostat. I had never tried these commands but have been using the set heating point. It usually works but not always. I used two commands (set mode to heat and set heating point) together for setting the thermostat and found I had to separate them using a wait to get more consistent results. A single command would likely have no issue.


#18

Don’t feel bad. I bet about 75% of the thermostats I’ve worked with needed Waits between commands… This is definitely a case where I would much rather have reliability over speed… (if needed, I am totally cool with a 20-30 second wait before the AC kicks on)