Have a remote button trigger multiple button presses on KukuHarmony


#1

1) Give a description of the problem
Setup: I have KukuHarmony running in a Docker container and it’s communicating with my Harmony Hub. I also have KukuHarmony as both a SmartApp and Device Handler in SmartThings with my AV Receiver added as a device. Lastly, I have a physical 4 button zigbee remote and I would like one of the buttons to trigger Volume Down multiple times (ie Vol Down, Vol Down, Vol Down, Vol Down). I am using Advanced Button Controller and it’s limited to toggling a device, turning something on/off, setting brightness level for lights. The way I was able to tie the button to Volume down is I defined the on/off behavior for the AV Receiver as Volume Down. Then I used ABC to program the button to “toggle” the AV Receiver device on and off. Each press actually sends a Volume Down command

2) What is the expected behaviour?
What I would like it to do is have a single button press translate to multiple button presses. I’d like it to act as a macro or series of commands. The use case is my wife is in an adjacent room and I am watching the TV too loudly. I do not want her to have to use Alexa or voice commands to lower it. We already use the remote for setting scenes and turning on and of flights. A physical button to drop the volume 4-6 steps would be ideal.

3) What is happening/not happening?
Right now I can only get it to send a Volume Down command per button press. The receiver has a number of buttons that are not really used so I am happy to reallocate one of them to act as this custom macro button. I am not sure how to approach this either - would the piston be tied to the remote button or the KukuHarmony AVR button?
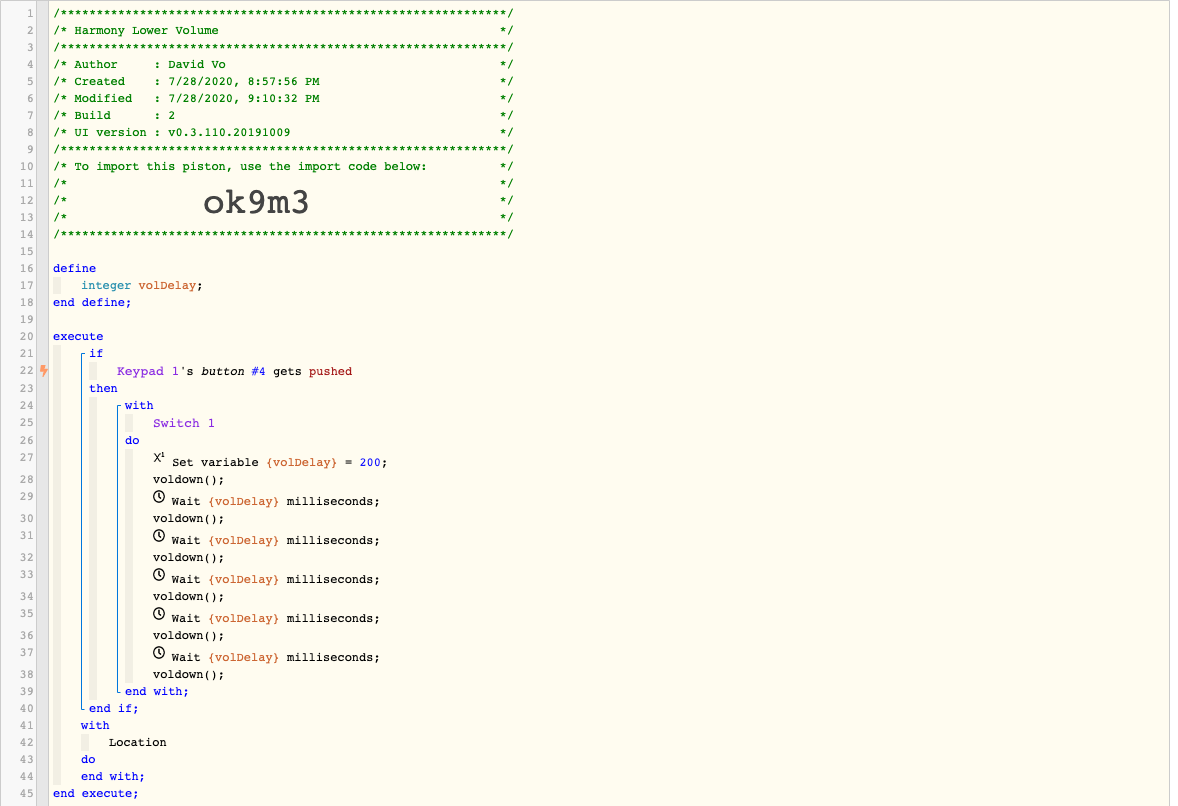
4) Post a Green Snapshot of the pistonimage
Sorry, I don’t even know how to get started on the piston.

5) Attach logs after turning logging level to Full
(PASTE YOUR LOGS HERE THEN HIGHLIGHT ALL OF THE LOGS AND CLICK ON THE </> ICON TO FORMAT THEM CORRECTLY)
Sorry, I don’t even know how to get started on the piston. I don’t have any logs!


#2

I have two questions…

(1) Would you be OK with a delay between the first volume drop and the 6th one?
(IE: one trigger to send all 6 commands, with a tiny space programmed in between presses)


(2) If your answer is “yes”, can you create a test piston with only a single command? Something like:

With device
    do Press Volume Down (or whatever it is called)
END WITH

Once the piston is saved, press Test to confirm that webCoRE can control the volume.


If you’ve made it this far, the rest is easy.


#3

Hi, thanks for your quick reply. I am ok with a delay between the first and sixth. I would even prefer to maybe add a small delay between each command because some AV equipment doesn’t like it when you spam buttons too quickly. I signed up for webcore, installed it on my Smarthings IDE and phone app and made a test piston using your example above and it does work. My receiver lowered the volume by one step!

I think I can figure out how to make it lower 4-5 times (by repeating the command) but I don’t know how to tie it into my button. Do webcore pistons save as “scenes” or “device” or something? I need to be able to select it in Advanced Button Controller which normally expects you to pick a device (ie light, switch, speaker).


#4

So happy to hear this, because that is where I was headed with that question, LOL


The simplified structure is something like this:

execute
    IF Zigbee button is pushed
    Then with device
        Press Volume Down
        Wait 600ms (or whatever)
        Press Volume Down
        Wait 600ms
        Press Volume Down
        Wait 600ms
        Press Volume Down
        Wait 600ms
        Press Volume Down
        Wait 600ms
        Press Volume Down
    END IF
END EXECUTE

Obviously, this concept can be turned into much more complex coding.
(For example, I would consider making the 600 into an integer variable, so you can try different delays by only changing a single line of code)


#5

Hi, I got it working and it wasn’t too difficult. The hardest part honestly after figuring out how things are actually tied together is getting used to the (IMO) awful web editor. I wish it would just let me type rather than using the mouse to drag items around and insert them. Anyway, thanks for all your help. You helped me accomplish something I’ve been wanting to do for years.


#6

Sweet! :+1:


I understand the temptation to manually type, but for a unique “language” such as this, the popups do make for a gentle guideline… Kind of nudging us in ways that it will understand.

It will not take long before it feels more intuitive. :sunglasses:


All that being said, I am a huge fan of drag/drop and copy/paste here in webCoRE.


#7

I could deal with the popups but for example, I wanted to add a wait timer. The only way I could think of doing it was to go down to an area that says “add a new task” and add it there then drag it into position. That means I could be adding it under the “else if” clause because it happens to be available even though I really want to enter it after a voldown() command under the “do” clause. The drag and drop is really clunky to. As you’re dragging the screen kind of flashes and half the time you let go and it doesn’t move at all! Ok enough ranting, I’ll think of more pistons to write and will try to get the muscle memory down to use this editor.


#8

I am walking out the door at the moment, but here is a quick answer:

Some commands are specific to a device handler (such as voldown())
Some commands are generic and work with many devices (such as toggle)
Some commands are built-in to webcore (such as Wait & Log to console)

But all commands need to be inside a block. They cannot be floating inside a THEN block by themself. They need a “container”. Usually:

Add a New Statement > Add an Action > Device

  • For generic stuff, I often leave the default "Location.
  • If I need to control a device, I select that here.
    Keep in mind that generic commands can also share this same space.

Another way to say this…

A generic command can be inserted into any block, but a specific command can only be inserted into a block using a compatible device handler. Since WAIT is generic, it can be created anywhere you see “Add a new Task”.


#9

I agree… I might recommend checking out my last link above. IMO, it covers some good tips to optimize your approach.