
After seeing a few posts on here & on the Plex forums, as a keen Plex user, I thought I’d look into using the Plex webhook with webcore.
I made three steps in my journey as follows and thought I’d document for others. I hope people find it useful.
- Receiving the information from Plex
- Dealing with known problems between Plex & webcore
- My final piston, including control of the Plex player
1. Recieving Information from Plex.
Plex allows you to setup a webhook which is called when the Plex media server performs certain actions, e,g media play,pause,resume, media add etc To use this you simply put the url of a piston into the webhook setting on Plex. More details are available from plex https://support.plex.tv/articles/115002267687-webhooks/
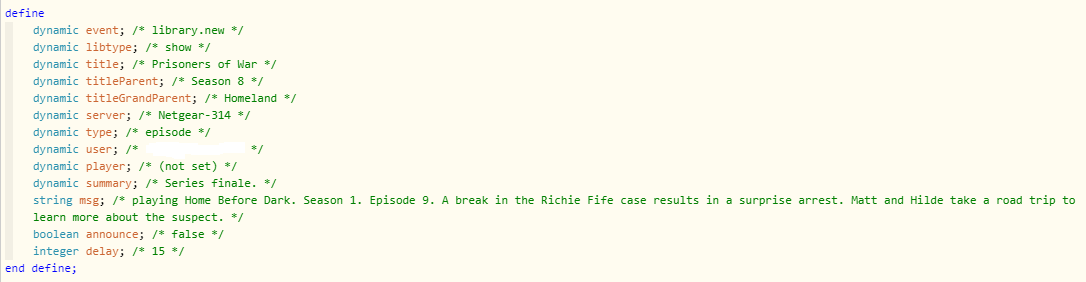
To access the data when the webhook is called the piston should set values as shown below. Note this does not cover all values, I actually found the Plex documentation doesn’t cover everything sent, including a show/film summary which I used in my piston
2. Dealing with known problems between Plex & webcore
There is an issues with some webhook calls e.g media.play, media.add. These send a multipart message with the second part of the message holding a jpeg thumbnail of the film/show. Webcore can not handle this request, as a result an error 500 is returned to Plex, and the piston never runs. Media.play is probably an event you would be interested in, as you can use it to set lights to “film mode” lower projector screens and blinds etc.
As a solution to this, I wrote a node.js app which I run on a raspberry Pi. To use the app, the plex webhook should be pointed to the app (http://raspPi IP:1111), rather than the piston url, and the line in the app which calls webcore should be changed to your original piston. The app will then receive the original message from Plex, and strip off the second part of the multipart message before passing it on to webcore. As the data is sent in the same format, you can use the same piston code directly from Plex or via the app. I’ve also submitted an enhancement request to plex asking for the option to not send the second part of the multipart message.
https://forums.plex.tv/t/webhooks-option-to-not-send-jpeg-image/573444
The output of the script is also useful as it shows all the data items available which maybe of interest. I’ve also left in commented out code which can be used to remove anything you do not went to forward to webcore.
var http = require('http');
var https = require('https');
var request = require("request");

http.createServer(function(req, res) {
    main(req, res);
}).listen(1111);

function main(req, res) {
    let data = [];

    req.on('data', (chunk) => {
        data.push(chunk);
    });

    req.on('end', () => {
        data = Buffer.concat(data).toString();
        // at this point, `data` has the entire request body stored in it as a string
        console.log(' ');
        console.log(' ');
        console.log('Processing request');
        header = "--------------------";
        data = data.substr(data.indexOf("name="));
        data = data.substring(50, data.indexOf(header));
        var data2 = '{"payload":' + data + '}';
        var jsondata2 = JSON.parse(data2);
        // remove unwanted JSON items
        //       delete jsondata2.payload.Metadata['Role'];
        //       delete jsondata2.payload.Metadata['Similar'];
        //       delete jsondata2.payload.Metadata['Location'];
        //       delete jsondata2.payload.Metadata['summary'];
        data2 = JSON.stringify(jsondata2);
        console.log('tidied data');
        console.log(data2);
        //make request
        request({
            url: 'https://graph-eu01-euwest1.api.smartthings.com/api/token/*********:',
            method: "POST",
            body: data2
        }, function(error, response, body) {
            if (!error && response.statusCode === 200) {
                console.log(body)
            } else {
                console.log("error: " + error)
                console.log("response.statusCode: " + response.statusCode)
                console.log("response.statusText: " + response.statusText)
            }
        })

    });
    res.end();
}
3. My final piston, including control of the Plex player
As a fun demonstration I wrote a piston to read out via my sonos details of the TV show we were about to watch. while this worked well, the message would talk over the start of the show, so I needed a way to pause until the message had played and then resume. The solution to this is shown in the piston below, and includes the ability to start & resume playback from webcore, which has other possibilities too. (e.g pausing if the doorbell rings)
To control the plex media player you need to obtain your plex token & the media player id, and replace these in the piston
Obtain your plex token
On any media in your library, click the 3 dots and select ‘get info’, then click view xml.
A separate tab opens showing the xml for the media item, look in the url for the “&X-Plex-Token=” and copy the value
Obtain your player address
From a browser enter http://media server ip:32400/clients?X-Plex-Token=******
You may need the player to be active at the time, you will then see an entry for each player as below
Server name=“Living Room” host=“192.168.0.95” address=“192.168.0.95” port=“32500” machineIdentifier="**********" version=“2.16” protocol=“plex” product=“Plex for Apple TV” deviceClass=“stb” protocolVersion=“2” protocolCapabilities=“playback,playqueues,timeline,provider-playback”/
copy the address, port into the piston, and use the machineIdentifier above as the X-Plex-Target-Client-Identifier value

Outstanding Issues
The media.play request doesn’t always seem to be sent by Plex, I think this is a Plex issue and have reported it on the Plex forum