Start playing a preset (favourite) on a group of Sonos speakers (not out of sync)


#1

1) Give a description of the problem
I can’t figure out how to activate a group (a Sonos group of 3 speakers) to play simultaneously.

2) What is the expected behaviour?
To have the 3 speakers play simultaneously (as if I started the favourite from the Sonos app). I know that there is groupId in Smartthings IDE, but now how to or if it can be used.

3) What is happening/not happening?
Right now my piston start playing 3 seperate versions of the same favourite on the 3 speakers.

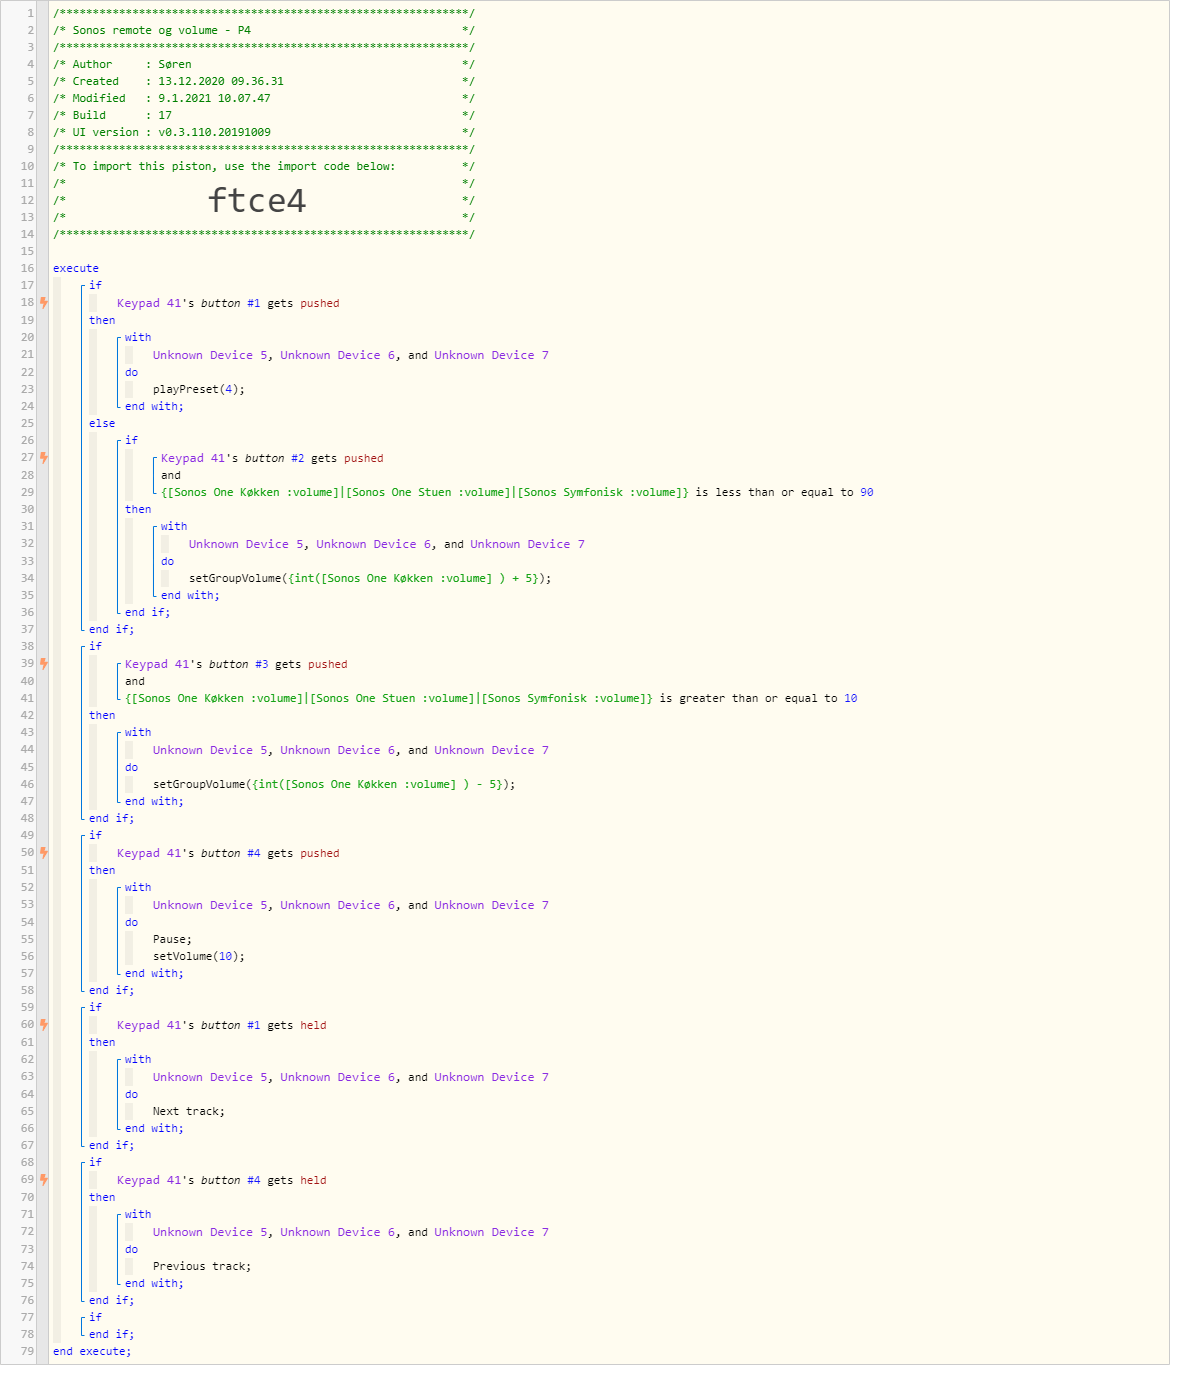
**4) Post a Green Snapshot of the piston![image|45x37]
(UPLOAD YOUR IMAGE HERE)

5) Attach logs after turning logging level to Full
9.1.2021 10.13.53 +681ms
+1ms ╔Received event [Sonos remote].button = pushed with a delay of 125ms
+68ms ║RunTime Analysis CS > 16ms > PS > 11ms > PE > 41ms > CE
+71ms ║Runtime (46438 bytes) successfully initialized in 11ms (v0.3.110.20191009) (68ms)
+72ms ║╔Execution stage started
+79ms ║║Comparison (enum) pushed gets (string) pushed = true (1ms)
+80ms ║║Condition #2 evaluated true (4ms)
+81ms ║║Condition group #1 evaluated true (state did not change) (6ms)
+83ms ║║Cancelling statement #7’s schedules…
+93ms ║║Executed physical command [Sonos One Køkken].playPreset([4]) (4ms)
+94ms ║║Executed [Sonos One Køkken].playPreset (5ms)
+99ms ║║Executed physical command [Sonos One Stuen].playPreset([4]) (3ms)
+100ms ║║Executed [Sonos One Stuen].playPreset (5ms)
+105ms ║║Executed physical command [Sonos Symfonisk].playPreset([4]) (3ms)
+106ms ║║Executed [Sonos Symfonisk].playPreset (5ms)
+112ms ║║Comparison (enum) pushed gets (string) pushed = false (1ms)
+113ms ║║Condition #23 evaluated false (4ms)
+114ms ║║Condition group #22 evaluated false (state did not change) (5ms)
+120ms ║║Comparison (enum) pushed gets (string) pushed = false (1ms)
+121ms ║║Condition #26 evaluated false (4ms)
+122ms ║║Condition group #25 evaluated false (state did not change) (6ms)
+127ms ║║Comparison (enum) pushed gets (string) held = false (0ms)
+129ms ║║Condition #33 evaluated false (3ms)
+130ms ║║Condition group #32 evaluated false (state did not change) (5ms)
+135ms ║║Comparison (enum) pushed gets (string) held = false (1ms)
+136ms ║║Condition #37 evaluated false (4ms)
+137ms ║║Condition group #36 evaluated false (state did not change) (5ms)
+140ms ║║Condition group #42 evaluated true (state did not change) (1ms)
+142ms ║╚Execution stage complete. (70ms)
+143ms ╚Event processed successfully (142ms)

REMOVE BELOW AFTER READING
If a solution is found for your question then please mark the post as the solution.


#2

It’s currently not possible to control grouping with webCoRE and ST alone. Many of us have installed a node server on a RPi using jishi’s code here with great success.

Once the node.js server is up and running, you can use GET requests within webCoRE to control your speakers.


#3

Okay. Top bad! I haven’t got the skilles or ressource to do that. If I some day should find the courage to do so, could you help with the GET request or point me to examples?
Thank you so much for your reply. I’ve been scanning everywhere for a solution for weeks.


#4

Its not too difficult to set up. These are my brief notes from setting mine up. This is for a rasp pi, but should work on any linux. (not sure if you can use the linux shell on windows?)

Ensure Pi is up to date
sudo apt-get update
sudo apt-get dist-upgrade

Download nodejs
curl -sL https://deb.nodesource.com/setup_6.x | sudo -E bash -

Install nodejs
sudo apt-get install -y nodejs

Confirm version
node -v

Download from https://github.com/jishi/node-sonos-http-api
into
mkdir /home/pi/sonos/
cd /home/pi/sonos/node-sonos-http-api-master
Install Dependancies
npm install --production

Create a free account on www.voicerss.org and obtain your API key

Create settings.json
{
“voicerss”: “Your api key for TTS with voicerss”
}

Start server

npm start

test via browser or curl
http:localhost:5005/kitchen/say/test


#5

I agree with @Paul1964. While setting up the RPi and the node.js server may seem complex and therefore intimidating, it’s not anywhere near that bad. Just follow the instructions. And believe me, it’s worth the effort for the flexibility and control you gain.

Depending on your operating system, there are some simple free tools you can use to access the shell and complete setup. In Windows, this would include programs like Putty and WinSCP.

Also, the GET requests are just are no more difficult than typing a URL.


#6

It’s easy to call from webcore, the piston below performs text to speech

and can be called as follows (note the speech isn’t synced on the 2 devices)


#7

Thanks. You are really great!
The sudo commands - I’ve seen some in Ubunte a couple of years ago. Is the raspberry pie the same principle? I actually think I might do it!
If I do it - the server needs to be running 24/7 right - or just when I need it - or?


#8

Again - thanks a lot!
Sorry for my lack of understanding - the shell? Complete setup of what?
And use Putty or WinSCP to what - control the raspberry pi? (I can see it’s a terminal program og FTP client).


#9

Thanks for the pistons. Agreed - it looks rather straightforward!


#10

The “shell” is simply the interface between the RPi’s operating system and you. In this case, it’s a command line interface similar to the old MS-DOS except that the command line language is different. To logon onto the RPi and enter the commands that Paul provided from Windows, you would use Putty.

WinSCP provides a File Manager-like interface that simplifies creating the directories, transferring files, and such. You can accomplish the same thing in Putty, but depending on your level of experience, WinSCP may be a little easier to use because it has a more familiar look and feel.


#11

You are so very kind. Thank you again for your expertise! Really appreciste it!
I guess I have to get starte then! Any suggestions to which Pi-version to go with and how much space?


#12

Not really. If it were me, I would buy the latest version. And since this is all new to you, you might want to consider a full kit with case, MicroSD card, etc. if only for the sake of simplicity. Perhaps others here might have different or more informed suggestions.


#13

I will go with a starter kit, as I am not skilled. Let’s see how well I do :wink:
I think I will have a look at Cast web api as well. Then I should be able to make it speak in my language (Danish)?
Thank you so much for your advice!


#14

I’ve just had a look, voicerss.org can do Danish. Just replace the en-gb in my piston with da-dk. I think its the easiest to setup, but maybe not the most natural sounding voice. Amazon offer a very good text to voice service, but its a bi more trouble to setup and I think there maybe a small cost.


#15

Ok thanks. The easiest - instead of Casp web api? - but will the voice in Cast web api not be more natural?
As a sidenote - would I gain anything by installing Ubuntu desktop instead? https://ubuntu.com/download/raspberry-pi


#16

I’m not familiar with casp, so I’m not sure.

You could use ubuntu on the PI, however I’d stick with raspian, I think most PI users and PI projects use it. raspian gives a windows type UI, there is a terminal program included to give command line control of the PI. You only need putty etc to access the PI if you dont have it connected to video/keyboard/mouse.


#17

Ok.
Thank you so much. I think I’ll dive into it :slight_smile:


#18

I actually use Amazon Polly for my voices as it has more voices and languages available and, to my ear at least, sounds far more natural.


#19

I tried the demo AWS voices and confirm they are extremely good. Upgrading from voicerss is on my todo list!


#20

Never heard of it but will have a look at it. Let’s see how it goes with the Pi!