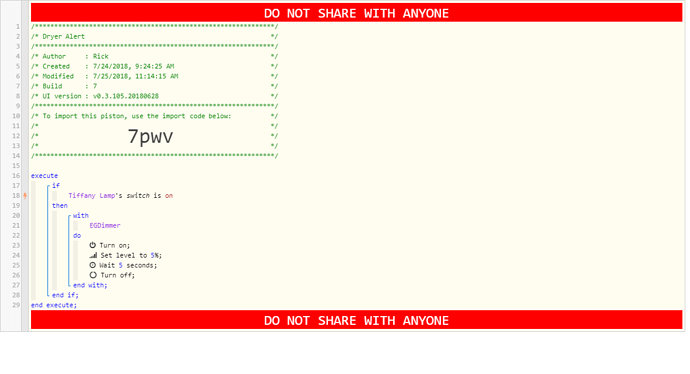
I have EventGhost installed on my PC so when a switch is turned on in Smartthings it shows in EventGhost. I have a Energy Monitor outlet on my dryer and have a poston set to send push notification when power drops below 10 watts. How do I get EventGhost involved so I might create an action on my PC
Thanks
P.S
One way I guess is to use IFTTT web hooks then create a virtual switch in Smartthings then add the virtual switch in EventGhost
WebCore and EventGhost
EDIT :
For an easier method, just skip to the next post.
I am leaving this up for advanced users.
You can edit that piston you already have. Add a new line right near where you “send push notification when power drops below 10 watts”. The new line either turns on or off the switch that EventGhost sees.
If you don’t want to use that switch, then make a new Simulated Switch and let THAT switch be the middle-man. If you go this route, don’t forget to add the new switch to both:
- ST App > Automation > SmartApps > webCoRE > Settings > Available devices & contacts
AND - ST App > Automation > SmartApps > Send Events to EventGhost > Dimmers
(otherwise EG/webCoRE won’t see the new device)
This will be LOTS faster response than going thru IFTTT.
By the way, if you use Simulated Switches, then each switch can send two unique triggers to EventGhost. (on or off) Perhaps a more advance (and useful) method is to create a Simulated DIMMER switch instead. (I call mine: EgDimmer) This will basically give you 100 different triggers in EventGhost from the one Sim device. Such as:

You can then have EG do 100 different things, depending on what number the switch was dimmed to in webCoRE… (ie: 1-5 can be alerts for your dryer… 6-10 can be for your washing machine, 11-15 can be your pool pump, etc) If you go this route, I do recommend keeping a text file of the numbers you are using so you can stay organized. (and leave extra blank (unused) numbers for each device so you can expand in the future)
So, for example, you could do something like this:
- IF Dryer power drops below 10 watts, then with EgDimmer set level to 1
- IF Dryer power rises above 10 watts, then with EgDimmer set level to 2
- IF Dryer power rises above 20 watts, then with EgDimmer set level to 3
- IF Dryer power drops below 2 watts, then with EgDimmer set level to 4
. - When sun sets, then with EgDimmer set level to 51
- When sun rises, then with EgDimmer set level to 52
. - When It is raining, then with EgDimmer set level to 61
- When It is snowing, then with EgDimmer set level to 62
- When It is clear outside, then with EgDimmer set level to 63
. - When I leave the house, then with EgDimmer set level to 71
- When I enter the house, then with EgDimmer set level to 72
. - When motion is detected after 4pm, then with EgDimmer set level to 81
- When motion is inactive after 4pm, then with EgDimmer set level to 82
(bad examples I know, but I just wanted to show you how one Simulated Dimmer Switch can send many different commands to your computer)
One of the beauties of using this method is that any piston only needs one new line added to set a specific level to EgDimmer. (it also saves you from continuously adding new Simulated Dimmer Switches to both EG and WC every time you want to add more functionality)
There are two caveats to keep in mind…
- Avoid using 0 (zero)… Stick with set levels of 1-100
- webCoRE cannot send the same level twice in a row.
(if the level is 75 already, then sending another set level to 75 is not seen by EG, but with all the examples given above, it should not really be a problem.)
If you do have a case where many of the same commands will be in rapid succession, you could always have the EgDimmer reset itself to 100 after sending out the real command. Such as:
When motion is detected, then with EgDimmer set level to 81
Wait 1 second
With EgDimmer set level to 100I forgot to mention, webCoRE can also send a GET request with a custom command attached.
Using the IP and port on your computer, the code is:
Make a GET request to IpAddress:port/?Keyword
Such as:
Make a GET request to 192.168.1.2:80/?DryerDone
Make a GET request to 192.168.1.2:80/?ArriveHome
Make a GET request to 192.168.1.2:80/?MotionDetected
The results in EventGhost is:

This method might be easier for casual users to get a handle on.
(I would avoid using spaces in your keywords)
Using External Information
Initiate EventGhost Action
I guess to make this a complete walkthru, I should probably mention that you can also pass arguments back in the other direction. (from your computer to webCoRE)
- Create a piston in webCoRE.
- Take note of the External URL
- In EG, create an Action > EventGhost: Python Command
- The command is:
import urllib; urllib.urlopen('')
(Your External URL goes between the quotes)
Running this in EG should run your piston. Simple enough…
If you want to pass along another parameter (or argument) then you can add one (or more) to the end of the URL like normal. Such as:
?PcLocked=false&CurrentApp=firefox
So basically, when my computer locks, EG sends one command, and when my PC unlocks it sends a different command to the same piston.
When Using PC:
import urllib; urllib.urlopen('https://api.smartthings.com/api/token/123abc/smartapps/installations/456def/execute/:789abc:?PcLocked=false')
When Screen Is Locked:
import urllib; urllib.urlopen('https://api.smartthings.com/api/token/123abc/smartapps/installations/456def/execute/:789abc:?PcLocked=true')
(Notice only the last word changed)
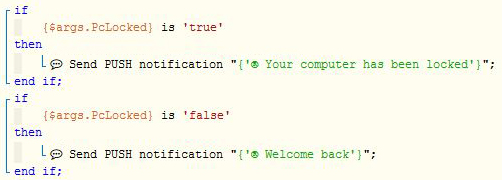
Then we just edit that piston again, and make sure it is looking for that arg, and acting accordingly. Such as:
Using External Information
Intelligent Echo Device Location change piston
Intelligent Echo Device Location change piston
So, in a nutshell:
EventGhost can send data, and webCoRE can act upon it…
…or…
webCoRE can send data, and EventGhost can act upon it…
…and perhaps the coolest one…
webCoRE / SmartThings / Alexa / GoogleHome can toggle a switch (real or simulated), and EventGhost can act upon it… Such as:
“Alexa, turn on VPN” can actually run a program in windows!
The only variation that I have not found is EventGhost turning on a switch directly… But this isn’t that big of a deal because EventGhost can tell webCoRE to turn on that switch.
Those are some great suggestions. Thanks alot. I had to think about it. I ended up using the simulated dimmer switch. I liked the idea of only one dimmer but several options in webcore.
I have one slight problem for now Im using a light switch as a trigger and EG only shows the dimmer either on or off
Figured it out I put it in both places as a switch not a dimmer. Saw my mistake after I read your post again
Looking good! If you want to streamline that a bit, you can totally drop the “Wait” as well as the lines “Turn on/off”, and it will still do the same thing. (Don’t worry, no electricity is used to power a Simulated Switch, hehe)
I was using Arduino hardwired to door and window switches for alot of this before I started buying z wave. I have a temperature sensor outside that arduino reads and then its read out loud on my computer and throughout the house. Could I put a motion sensor (with temp) outside and use WebCore to somehow push the temp to my computer and use Ivona or something else to read the temp
Well, in EventGhost, you can add a Plugin to the Autostart section called “Other > Speech”. Once that is in place, you can add a new Action: “Speech > Text to speech”, and you will get something like this:
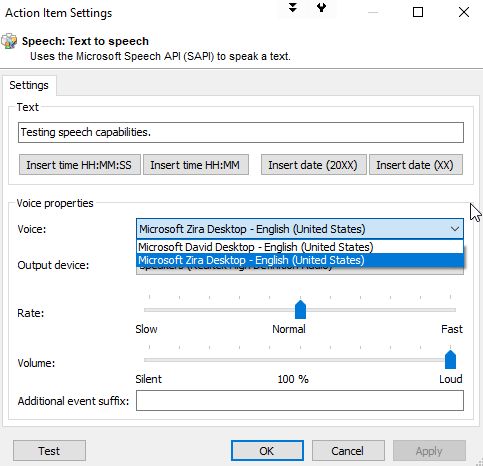
It comes with two voices, but I have seen other people add more to the list.
I think the challenge will be to get a variable from webCoRE to be spoken in EventGhost. I know it is possible, but requires a bit of scripting. (usually python) I usually simplify and have “canned responses” at the ready, just so I don’t waste time scripting.
When I want current variables to be spoken outloud, I use my Tasker method described here to get really customized text alerts. Yes, I still had to code that, but with the one code in Tasker, I never need to code again for any incoming variables.
In other words, EventGhost is easiest with pre-determined spoken responses, such as “Welcome home” or “Turning on AC now”… (or playing a wav sound effect)
OK about the virtual dimmer.
Im monitoring power for washer and dryer and a piston for each
In EventGhost on my PC I can see the piston working it shows up on the left side of EG it also shows the dimmers level. On the left side I create an action and I drag the st.STEventghostdimmer to the right side. when I do that the dimmer level does not show up. I dried to right click and configure and type the level in as it appears on the left side but then it does not work at all. Whats happening is when the piston triggers it uses the same action for both the washer and dryer. Not sure why
correction its playing both wav files its just that the first one does not get played just goes right to the second one
In my piston I set the level to 5 then wait then to 1 and I notice that the action is triggered at the level 5 and again at level 1
Oh yea, sorry, I forgot to mention that. Anything past the core command is stored in a payload. You just have to create one extra macro for it to work. (shown below)

Line 1 is: a Macro (with any name)
Line 2 is: the normal drag trigger (with no trailing stuff)
Line 3 is: Add Action > Python command
The python command on line 3 is:
eg.TriggerEvent("EgDimmer." + eg.event.payload[0])
What this does is when your Sim Dimmer changes, it triggers those 3 lines above.
That code strips the number at the end, and sends out a NEW trigger.
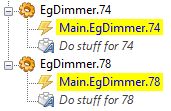
(Main.EgDimmer.74 for example) This new trigger is the one you want to watch for, and do your sound alerts etc.
In other words, the “EgDimmer Retrigger” section only needs to be created once. The 2 samples below that are for whatever numbers you are using. (easy to copy/paste for new numbers in the future)
Intelligent Echo Device Location change piston
Thanks that was a hair puller for awhile.
In regards to the Temp and EventGhost I think I will leave that alone for now but thanks for the info.
I think that’s it for today 
Every thing is working good now
Well, since we have already ventured into a bit of Python scripting, here is how you can do this:
Make a piston in webCoRE with the following line:
Make a GET request to 192.168.1.2:80/?OutsideTemp&78&Cloudy
(change the IP and port to match your PC)
Then back in EventGhost, we look for the trigger “ST.OutsideTemp” such as:

The code in line 3 is:
It is currently “{eg.event.payload[0]}” degrees outside and “{eg.event.payload[1]}”
When I trigger the piston in webCoRE, my computer will say, “It is currently 78 degrees outside and Cloudy”
For the record:
“{eg.event.payload[0]}” is the first parameter sent from webCoRE
“{eg.event.payload[1]}” is the second parameter sent from webCoRE
and so on…
Of course, once you have got it running, you’ll want to tweak your piston to put REAL data in the URL before sending the GET request… Such as:
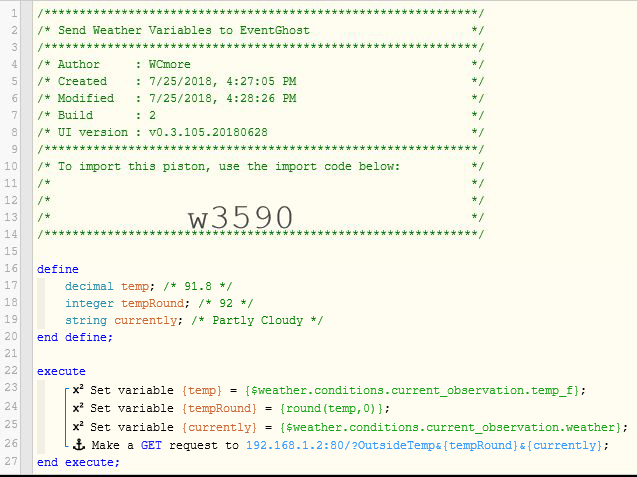
(as usual, change the IP and port to match your PC)
I got the temp to show up in EG but not exactly clear on how to get it to speak the temp
I see in the third line it starts with
Speech: Speak:
Not sure how you got that.
I have the event under my new macro (st.Outside temp)
You’ll have to save after adding to the Autostart section, and then probably restart EventGhost so it loads the proper files.
yup did that then when I create a new task it opens up the text to speech window. In the text window it typed in Its currently then at the bottom there is a place for additional event suffic thats where i pasted in “{eg.event.payload[0]}” degrees outside and “{eg.event.payload[1]}”
obviously thats wrong casuse it didnt work
Yes, leave the suffix section blank…

Your speech output goes in the top line (where I typed “Testing speech capabilities”)
Just for the record, I don’t think you can use the Sim Dimmer to send extra parameters (like temperature). I would use the method described in this post when you want to pass variables from webCoRE to EventGhost.
OK I got it working.
Thanks for all your hard work. I just have to add an action to get it to say the time. Not sure what I want to do yet.
I do have a couple questions
When I changed to your piston it didnt work and I noticed that on my piston in the line with the ip address at the end I have the word (form) on yours you have the word (JSON)
I had to change that back to the word (form)
One other thing where does it get the weather info Im asking because it says its 91 out right now and really its only 80
If you are doing a POST request, then you have those extra options.
The method I suggested was a GET request which has neither form nor json attached.
![]()
This is from WUnderground based on the location you have setup in the SmartThings IDE.
(by the way, the variables at the top of the piston only update when the piston is run, so there is a chance it is showing old data)


