
UPDATE 2017-10-18
SmartThings has fixed the bug that would delete the parent SmartApp when the last child device would be deleted. It is now safe to install your presence sensors into your main (and most likely the only?) webCoRE instance you installed. As a result, I have opened the Android beta to anyone who wants to test.
Please note this is a beta product and requires that you request an invitation. Google requires that you provide a gmail or Google Apps email address as part of the process. You will need to visit a link after your email address has been entered in the test group. The Android app is in its infancy and a lot of visual issues may be present. Location is updated when there is a change of at least 10m and not more often than 1 minute - this will change later to about 500m and 5 minutes to preserve device battery.
Steps to install the webCoRE Presence Sensor
-
Install and publish the DTH
Login to your IDE and go to the My Device Handlers tab.
- if you installed webCoRE using the github integration, click on Update from Repo and select webCoRE (master) from the list. Select the webCoRE Presence Sensor from the list, make sure to check Publish, then click Execute Update
- if you installed webCoRE using the source code, you need to add and publish a new DTH from code. Find the source code here.
- Ensure the webCoRE Presence Sensor is now listed in your My Device Handlers list and is marked as Published.
IMPORTANT - Update the smart apps and DTH
Please make sure to update the Smart Apps and the DTH to the latest - this is required for the Android app to work. The webCoRE version has been preserved to avoid having everyone update.
-
Install a blank instance of webCoRE (strongly recommended)
This step is recommended because there is currently a feature of SmartThings that silently deletes a SmartApp instance when the user deletes the last child device. That means that adding a presence sensor to your main webCoRE instance and then deleting it from the ST app or IDE will silently and irrevocably delete that webCoRE instance along with all of its child apps (pistons). SmartThings is working on improving this feature and this step will no longer be required when that is done. Until then, it is just safer if you use a blank webCoRE instance for presence purposes as you do not risk any pistons. Go to your ST app and visit the Marketplace, go to My apps and install webCoRE the same way you did the first time - choose a name that’s different than your main instance’s name so that you can tell them apart, choose a password, don’t worry about adding any available devices or contacts, just tap Next, Next, Next, Done. A new (and blank) instance of webCoRE should now exist in your Automations > SmartApps tab. -
Add places using a desktop browser (optional - you can do this in step 6 by using the webCoRE app on your phone, it is just easier to use a desktop browser)
If you haven’t done so yet, visit https://dashboard.webcore.co and register a new instance (click on the Options and Register another instance). Open the webCoRE instance in your ST app and tap Register a browser. Use the code provided in your browser and click Register - you are now logged into the new instance - you can switch between the instances by clicking the instance dropdown at the top left of the interface. Go to Settings and then Places.
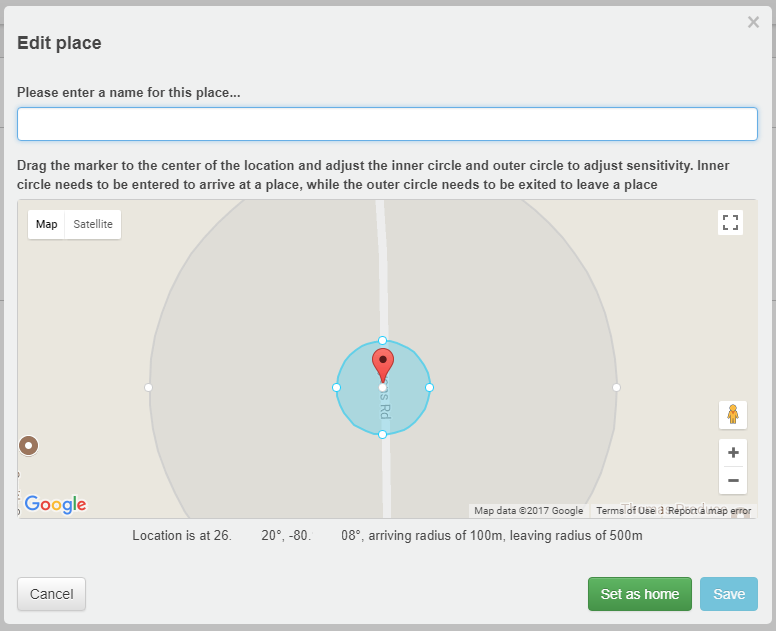
Click on the + button to add a place, if you allowed the browser access to your location, it should default that place to your current location, if not, pan to the right location and click there, the marker should move in the right place.
The two circles default to 100m and 500m radii. Try to keep a good separation between the two for best results and less fake alerts. The minimum inner circle radius is 50m and the minimum separation between the circles is 200m. Give that place a name and click Save. Keep adding as many places as you need (up to 10). One of them (by default the first one) can be set as home by clicking the Set as home button. Only the home place will be driving the presence attribute of the sensor - the others provide other events for you to know when someone is arriving, has arrived, is leaving or has left each of them.
When done, click Apply to save all changes. -
Request a Google Play Store invitation
Send @ady624 a PM with the following information (fill in the blanks). Make sure to provide a gmail or Google Apps email address - you will need to login with it when following the opt-in link.

Platform: Android
Email address:
-
Install the webCoRE app
Visit the opt-in link here after you email address has been added to the test group. Become a tester and a link will be provided to install the app.
KNOWN ISSUE - it appears that setting up the sensor does NOT work the first time around - clicking does nothing. Kill the app and open it again to fix this. I am looking into what is causing this.
-
Set up the presence sensor
Open the webCoRE app and follow the same instructions from step 3 to register the newly installed webCoRE instance. If you skipped step 3, you will need to add the places at this time. Once you have at least one place added to the list, a green button should appear with the Setup sensor caption. Tap on it and you will get a dialog asking you to provide a name - this is the ST device name for the new presence sensor. Add a name, making sure it is easy to distinguish for any other existing devices you have in ST (i.e. add (beta) at the end of the name) and click Save. The green button should now disappear from the list. When it does, click Apply to close that window. A new device should now be present in your ST app - it’s your brand new presence sensor. -
Make the presence sensor available to your pistons
If you took the advice on step 2 and installed the sensor in a new and blank webCoRE instance, you need to visit your primary instance in the ST app and go to Settings > Available devices > Sensors and add the newly created presence sensor to the list so your main webCoRE instance can access it. By default, the webCoRE instance used to create the presence sensor will automatically gain access to them so you don’t have to add the sensors to the available devices list, but remember you installed the sensors in a different instance.
The newly created presence sensors should automatically be available in your pistons belonging to the same webCoRE instance (most users only use one instance, so they should simply have the sensors available, no need to revisit the Available Devices) -
Pretend you need to go buy something just to test how it works
Grab your keys and leave with your ST app open Look awkward as you walk down the street with your eyes pinned to your phone. You know what to do next.

 )
)