
As we all know, there are many built-in ways in webCoRE to restrict either the full or partial execution of a piston. You can select things like time of day, days of the week, whether it’s before or after sunset, location mode, presence status and many more. However, there are times when even all of those options are not enough. Below I will explain multiple different methods that you can use to restrict either the full or partial execution of a piston. These are not intended to be examples on how to perform a specific task, but rather they are designed to be a framework from which you can build your own full solutions.
1. Using a Boolean variable
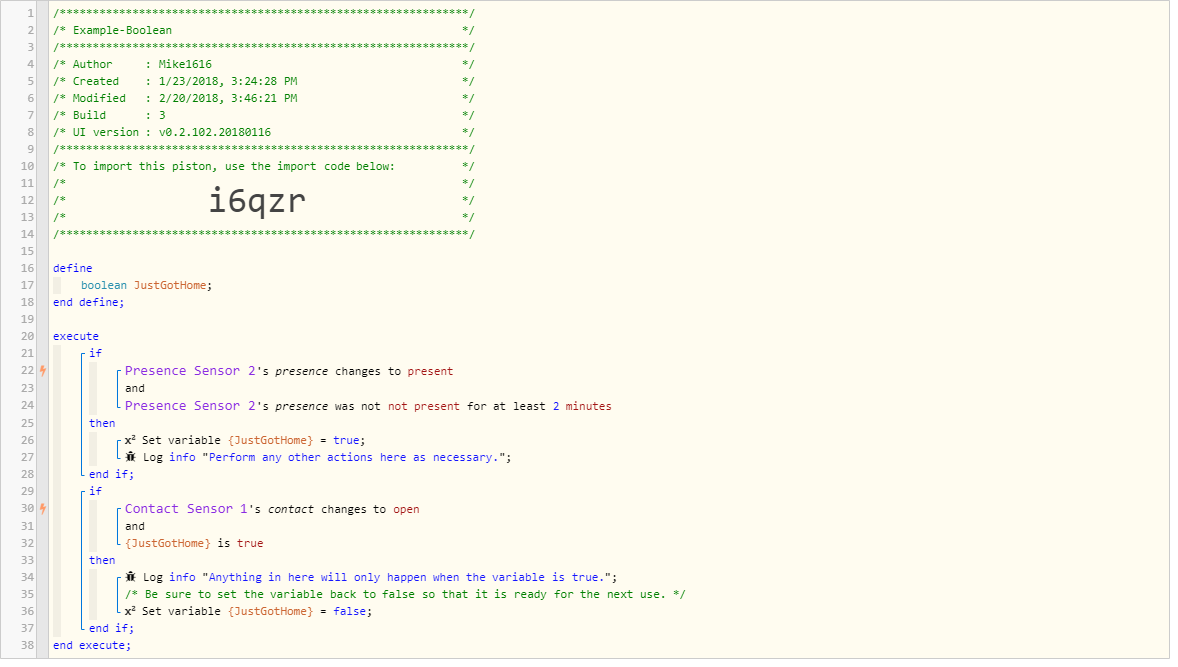
Boolean variables are very much like a standard light switch. They can hold a value of either True or False which is very much like On or Off. To use a boolean variable you define it at the top of the piston. It is important when using a boolean in this manner to not define a value for it at the beginning of the piston. We want the conditions that happen in the piston to change the variable as needed. So we purposely leave the value blank initially. Likewise, when we have used the boolean variable to do what we wanted it’s important to set the value it has back to the normal state we want it to have.
In the example below, I’m setting a boolean variable to be equal to true when a presence sensor is detected to have just changed to be present. This way any future triggers in this same piston will only execute if the boolean variable is true, meaning they will only execute just after the person got home.
So in this example we’re restricting the piston to only trigger when the person just gets home. Opening the contact sensor at any other time while the person is home will do nothing.
2. Using a Counter
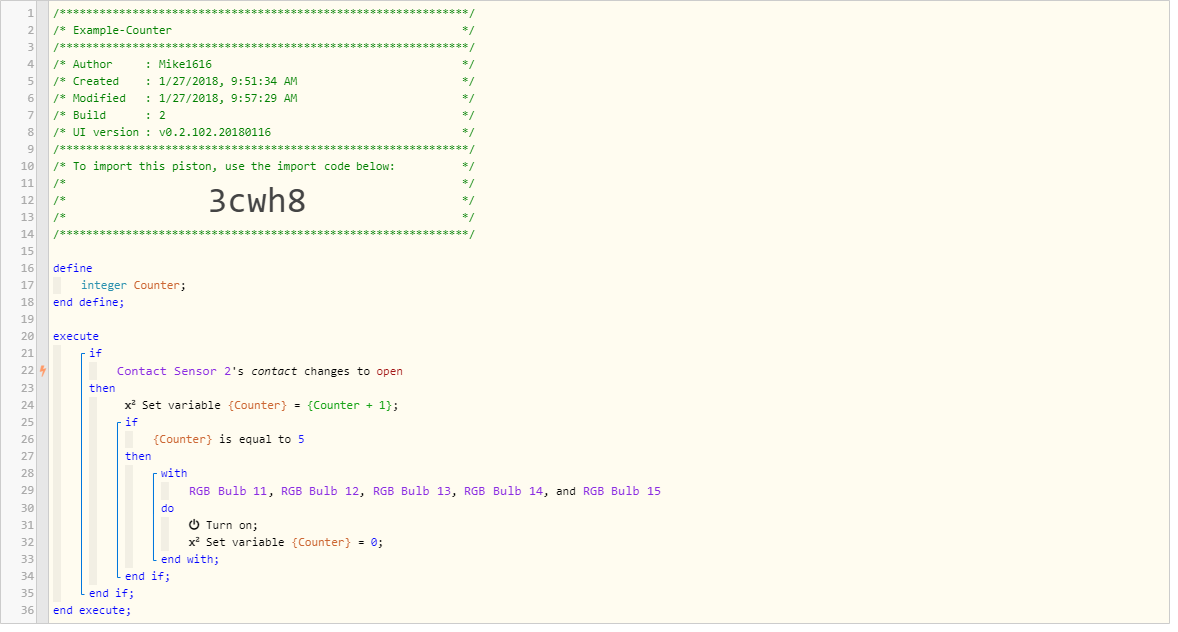
There may be times when you only want to perform the actions in a piston after a certain number of times an event or device is triggered. In this example I’m showing how to use a motion sensor and an Integer variable to hold the value of the number of times the motion sensor is triggered to Active. When the counter reaches the desired number, the rest of the piston will execute. A motion sensor is just one example. But you could have a piston based on any event and have it count up to your desired value before proceeding with the rest of the actions. Counters can be very powerful resource to have if you want to restrict a piston to only run after a specific number of events have happened.
3. Followed by
This is a built-in function of webCoRE but since many people do not now that it exists I will include it here. Followed by is a great way to restrict a piston to only execute when multiple events/triggers happen in sequence. Pistons generally fire off based on certain event triggers. The nature of triggers means that two of them can never be true simultaneously. One of them will always report that it happened first (down to the millisecond level) therefore using two triggers to initiate a piston to start will fail…unless you use “followed by”. This example shows a motion sensor changing to active followed by a contact sensor opening. So if you had a motion sensor in your garage and and within two minutes your back door opened you could likely deduce that you’re coming in from outside. However if hose triggers happened in the opposite order then you’re likely going out instead. Different things could then be slated to happen based on that calculation.

4. Using time as a "lockout"
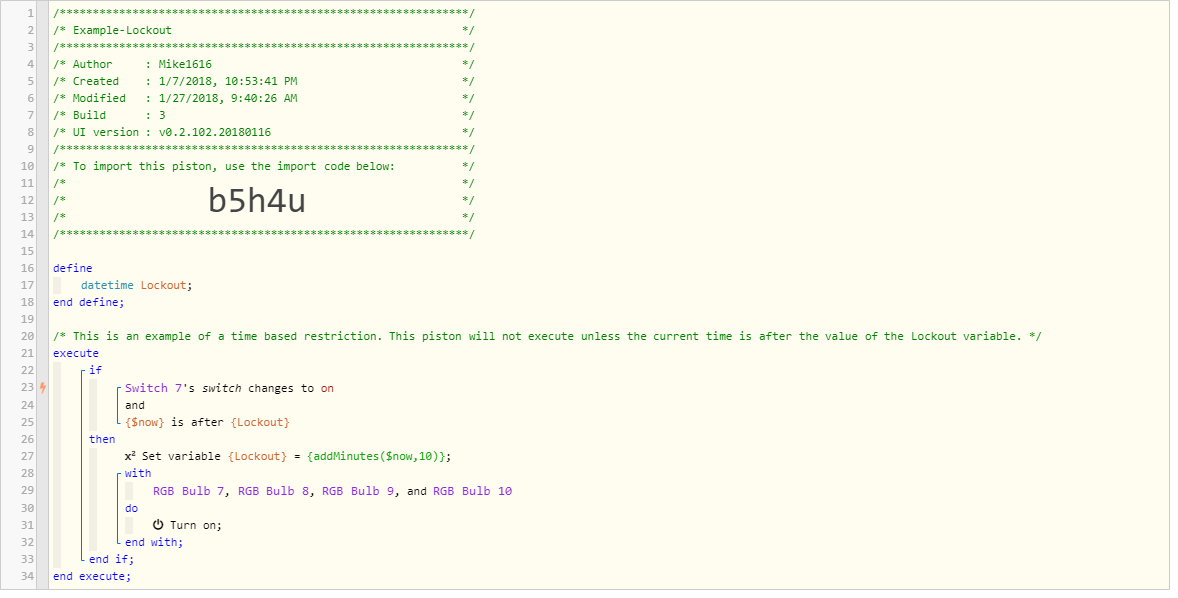
This is a great method to restrict a piston so that it only executes once within a specified time period. To do this I’m using a datetime variable and setting the value that it has to a point in time in the future. The addMinutes function is used in an expression to set the value stored in the Lockout variable. There are of course other functions for addHours, addDays, etc. So you can set the future time to be whatever you desire. The way this restriction works is to compare the value of the system variable for the current time, which is $now, to the value that is stored in the Lockout variable. Since we are specifying that $now must be after the value in Lockout we are, in this example, saying that this piston will only run once every 10 minutes. Or said differently, this piston will only run again when both the switch changes to On and the time is 10 minutes later than the last time it successfully ran. ff the switch changes back to on in 5 minutes, that will be ignored by this piston as the time condition is not met.
5. Using previousAge
Technically previousAge is also a built in feature of webCoRE, however, we’re getting into some advanced territory here so I saved this one for later. Devices do store a datetime value of the last time that they processed an event. So in the example below I am showing how to do something very similar to the lockout example above by testing for the last time that a contact sensor opened and only proceeding if it was more than 30 seconds ago. However, the important thing to note here is that you can use the previousAge value from any device and not necessarily the one that just triggered the piston. So if you wanted to test for the previousAge of a presence sensor after a contact sensor has been tripped you could do that. When using previousAge you must ensure that you get the name of the device in the expression spelled and formatted correctly. I find it easier to use a device variable in these cases so that you don’t have to change several expressions if you make a modification to the devices used in the piston. Also note that the value stored in previousAge is stored in milliseconds, so you have to account for that in your comparisons. I pulled out all the stops in this last example piston, also showing the use of a boolean and even including a While Loop which will continue to run until the contact sensor is closed again.
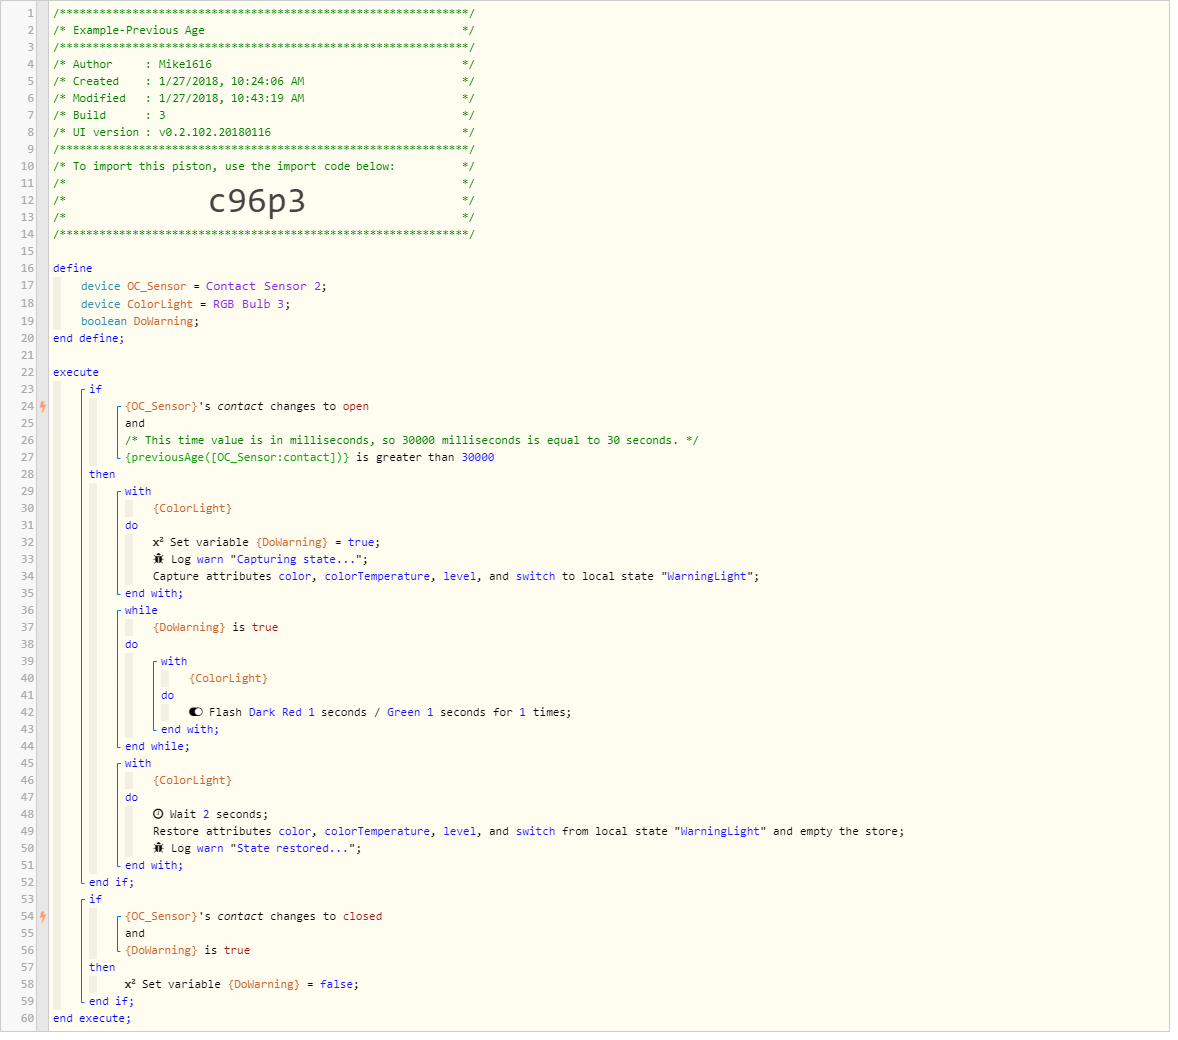
One little caveat to this example, webCoRE is a cloud based rules engine, so the actions that you’re telling the system to perform have to go out to the cloud and come back again. So this specific piston example which flashes a light may take some time to notice that the contact sensor has gone back to closed. Meaning it may still flash several more times after the contact is closed. Your own environment (connection speed to the Internet and such) should be taken into consideration before using something like this one. But it’s still a good example of the type of restrictions that are possible within a piston.
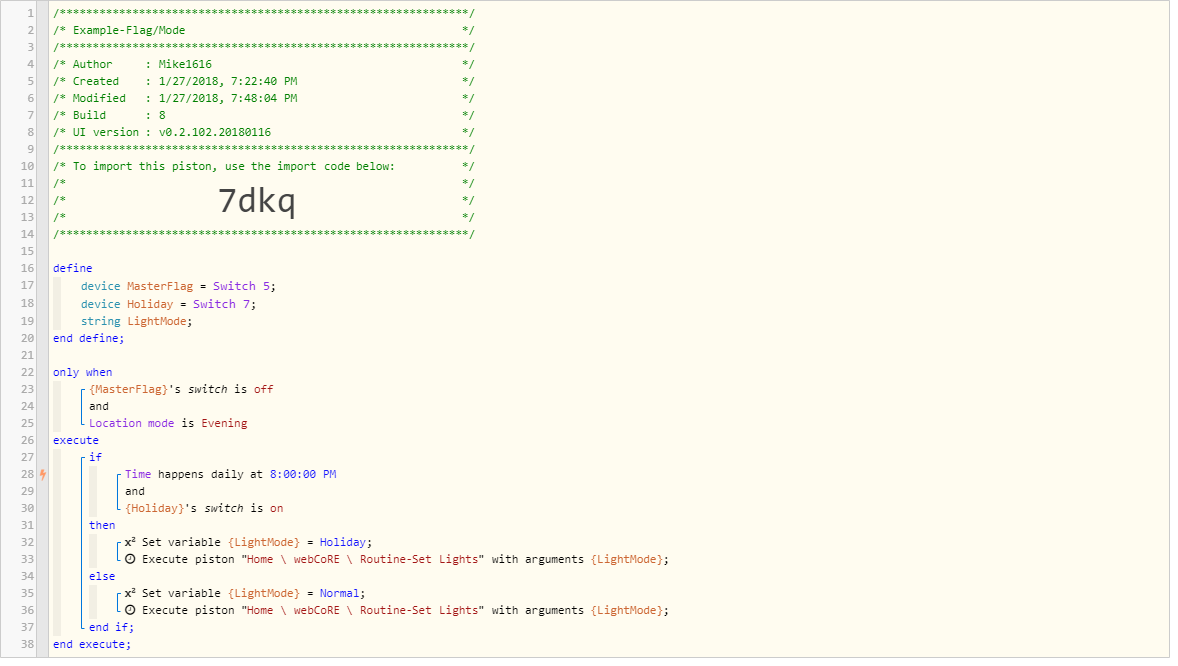
6. Using a “Flag” and Location Modes
In this example I’m showing the classic “restriction” on a piston that is available in the the editor. This is the simplest way that you can restrict the execution of a piston (by wrapping the entire thing with an actual restriction). However, I’m introducing a couple more concepts here. First, there’s the concept of a “master flag” switch that you can setup so that you can disable all of your pistons at once with the flip of a “simulated switch”. See the article below on how to create a simulated switch (also known as a “virtual switch”) in the IDE.
As I’ve said, many people use this concept to turn off the execution of all of their pistons (say if they want to do maintenance on things or perhaps if they go on vacation). In the example below, nothing in the piston will execute unless the “MasterFlag” switch is in the OFF position. If the Flag is set in the ON position then essentially nothing in this piston will happen. A flag is very similar to a Boolean variable, but by popular demand I’m showing it in its own section.
Additionally I’m also showing how to use a location mode as a restriction. Location modes are very powerful as restrictions as they can be set on the entire piston (as shown in the example below) or they can even be setup on each command.
Please note, this example uses “Time” for the trigger to start the piston. Restrictions on the outside of a piston can be used when you are using Time as the trigger…however, DO NOT use restrictions on the outside of a piston when using a Timer. I’ll cover restrictions on timers in the next example.
Also of note in this example is that I"m showing how to call a different piston and pass Arguments to it. Calling other pistons is a good way to reuse code that you write and to consolidate things.
7. Restrictions on a Timer
One of the things that took me a while to realize in webCoRE is that different rules apply to restrictions on Time versus a Timer. When you configure a piston to have a Timer in it, the outside restrictions on the Timer are evaluated when the piston starts, not when the piston wakes up to execute the Timer. Read that again if you need to as that is an important concept to grasp.
What that basically means then, is that if you want to place any restrictions on a Timer that might change while the timer is counting down then those restrictions need to be on the INSIDE of the Timer and not on the outside of it. (Technically there is a way to use restrictions on the outside of a Timer, but that requires putting in additional Triggers for each restriction that might change…suffice to say, putting them on the inside of the Timer is easier and looks much cleaner). Examples of restrictions that might change include Location Mode, Presence and the state of device such as real or simulated switches.
In the example below, I’m showing a Wake up routine that I use. This one actually has two triggers in it as sometimes I get up early and start the routine by turning on a virtual switch with the Echo The piston still runs at 6:30, but instead of executing fully it just turns off the virtual switch so that it can be used again the next day. Again note that these restrictions are all on the inside of the Timer and therefore they will all be properly evaluated when the Timer executes.

Well, there you have it. Several ways that you can restrict all or parts of a piston from running using various methods that are possible in webCoRE. My hope is that these examples demonstrate a little more about what you can do with this platform and further that they inspire an idea that you can eventually share with everyone else.
See one, do one, teach one…


