Edit January 2022: This post/thread is still active, and what you are about to read is still working like a champ. (With so many changes at SmartThings, it’s good to know that this method below will continue to work during and after the transition. Just make sure step 6 below points to whichever version of the ST app you are using)
♫ For your enjoyment, I have added optional background music while you read ♫
(both choices below are instrumentals, with no distracting vocals)
For the traditionalists, here’s some Classical Cello that might take you thru most of this thread…
I recommend setting the volume to about 20% on this one (it builds up)
For the younger generation, or world music lovers… here is an energetic Irish medley of sorts…
I recommend about 40% volume on this one. (Whiskey is optional)
OK, on to the good stuff!
I love my Echo devices, but the notification abilities are quite limiting at this time.
Wouldn’t it be cool if webCoRE could announce out loud any important notification?
(Alexa is not required for this… Any speaker will work!)
- “There’s a 75% chance of rain today. Don’t forget your umbrella!”
- “Your wife just pulled in the driveway. Better look busy!”
- "It’s 79° and Partly Cloudy outdoors. Tonight’s low is 50°. It is a comfortable 73° inside.”
(this last example uses 6variables… 2 of which are somewhat hidden)
In addition, can you imagine the possibilities of webCoRE controlling your Echo devices?
- Alexa, what’s on my calendar?
- Alexa, play Pink Floyd on Spotify
- Alexa, play WKRP on TuneIn
- Alexa, set timer for 2 hours
- Alexa, what’s my flash briefing?
Well, I have found an easy method to attain this, so webCoRE can now do anything that Echo can do (as well as things not normally possible). Depending on what you have laying around the house, your investment may only be $5 $6. (as of Aug 25, 2020)
Requirements:
- An old Android phone/tablet
- A bluetooth (or wired) speaker connected to that Android device
- An Echo device near the speaker (Optional, but useful for advance features)
-
Tasker for Android (
$3$3.49) -
AutoNotification for Android (
$2$2.49)
For those unaware, Tasker is a powerful way to control Android, and highly recommended for any power-user. It can also send/receive commands to/from webCoRE, so the possibilities are limitless.
Here is the basic setup:
(1) Plug your old Android device into the wall (we want permanent power)
(2) Connect your speaker to the Android (either Bluetooth or 3.5mm jack)
(3) For advanced features, move an Echo device within a couple of feet of that speaker
(4) Test to make sure all sounds go thru the connected speaker
(5) Install SmartThings, Tasker & AutoNotification on the Android
(6) Program Tasker to look for specific notifications, and read the text out loud
(7) Program any piston in webCoRE to send any text to be read out loud
Step 1-5 above only takes a few minutes, and should be self-explanatory. I will use this thread to focus on steps 6 & 7.
Step 6 might take 20-30 minutes to setup correctly. Thankfully, it only has to be done once, and will work for years without any further editing.
Step 7 only takes a few seconds for each piston that you want a voice announcement to be read out loud.
Step 6 Detailed Instructions:
Once Tasker is installed on your old Android, you’ll want to create a new profile:
(+) > Event > Plugin > AutoNotification > Intercept > Configuration
There’s a lot here, but you only need to edit the ones listed below:
Action Type: Created
Persistency Type: Both
Apps: SmartThings should be checked
App Name Filter / Notification App: SmartThings
Package Name Filter / Package Name: com.samsung.android.oneconnect
Title Filter / Notification Title: My home
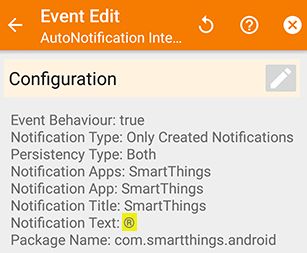
Text Filter / Notification Text: ®
The last line above has the registered sign ![]() . If your Android keyboard doesn’t have it, use Windows Charmap.exe to find it, or copy it from here:
. If your Android keyboard doesn’t have it, use Windows Charmap.exe to find it, or copy it from here:
®
We want a key that we never use for anything except this.
Once you have done that, back up once, and it should look like this at the top:
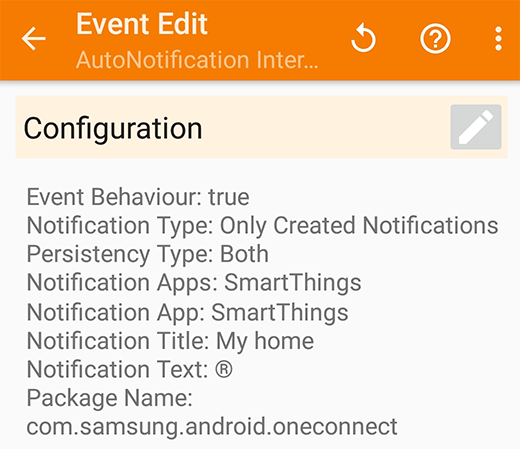
When you back up a second time, choose “New Task +” at the top,
(I called mine “ST_ReadAloud”)
Then touch the checkmark to jump to the Task Edit.
From this “Task Edit” screen, the (+) will add new commands (lines).
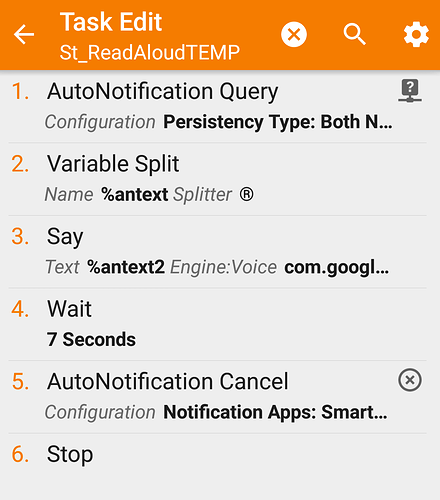
We are going to program 6 lines (the lines below are clickable).
LINE 1
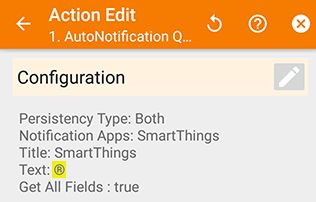
(+) > Plugin > AutoNotification > Query > Configuration
Persistency Type: Both
Apps: SmartThings should be checked
Title: My home
Text: ®
Advanced > Get All Fields: Check this box
Backing up once should show you this up top:
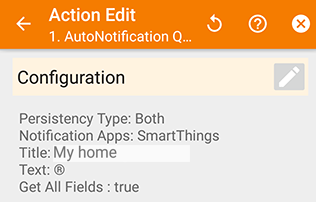
Backing up again should put you on the Task Edit screen.
From here, we can make the second command now:
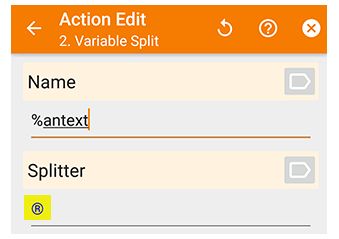
LINE 2
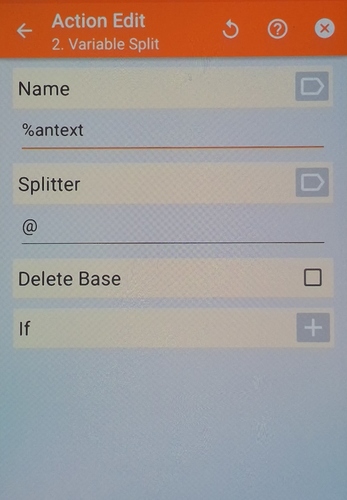
(+) > Variables > Variable Split
It should look like this (case sensitive):
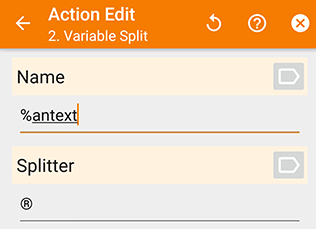
Backing up again should put you on the Task Edit screen.
From here, we can make the third command now:
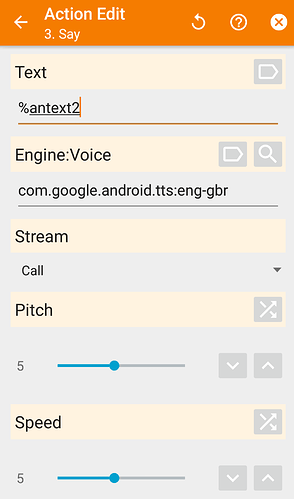
LINE 3
(+) > Alert > Say
It should look something like this:
Manually type %antext2, but next to Engine:Voice, click the magnifying glass to choose a voice. (every device is different) You might come back to this one later to play with the Pitch & Speed to get the voice sounding the way you want it.
I would also make sure that there is no check mark next to:
“Continue Task Immediately”
(It sounds counter-intuitive, but it doesn’t speak immediately if checked)
Back up to the Task Edit screen.
The next two lines (4&5) are optional, but they clear the notifications from the device once they are read aloud.
LINE 4
(+) > Task > Wait
I set mine to 7 seconds, but ideally you want it a bit longer than your longest text to be read out loud.
(10-15 seconds might be better if you’re prone to complex pistons)
Back up to the Task Edit screen.
From here, we can make the fifth command now:
LINE 5
(+) > Plugin > AutoNotification > Cancel > Configuration
Apps: SmartThings should be checked
Title Filter / Notification Title: My home (then check exact)
Backing up once should look like this up top:
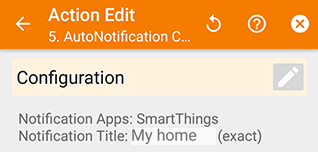
Back up to the Task Edit screen.
From here, we can make the sixth, and final command:
LINE 6
(+) > Task > Stop
There is no need to config this one. Just back up to the Task Edit screen.
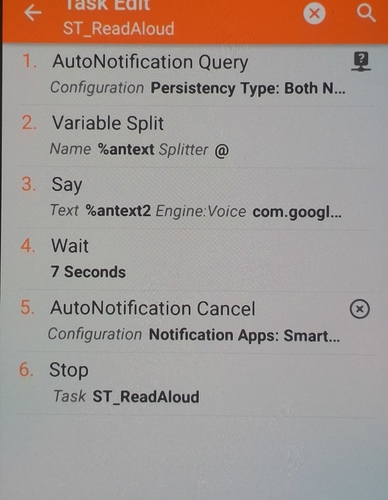
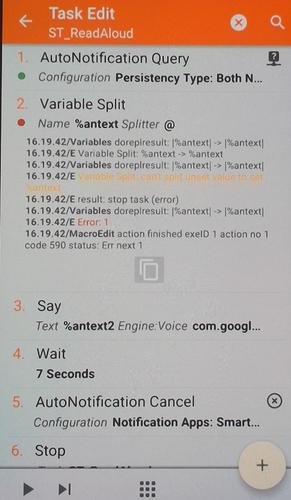
Your full Task should look like this:
If yours matches, then back up many times all the way to your desktop to save all your code.
OK, we are done with Tasker. Everything else is done inside webCoRE, and is much easier from here on out.
Step 7 Detailed Instructions:
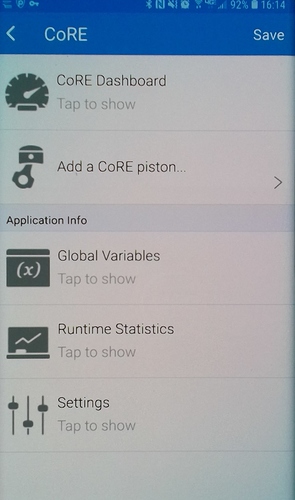
You won’t believe how easy it is in webCoRE now. Once Tasker is set up correctly, you only have to add 1 extra character (®) in your piston to make any notification be read out loud. (You will never need to tweak the Tasker profile, unless you want to change the voice heard)
In any piston, all we need is to:
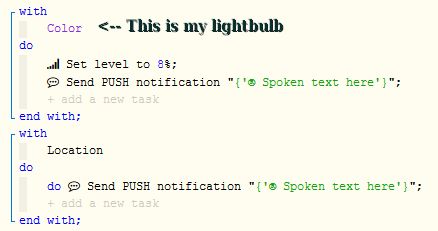
Send PUSH notification
and in the expression box, put something like this:
"® This text will be read out loud"
Note: In the new ST app, I believe “Store in Messages” should be ‘true’ for the PUSH to go thru.
Edit April 2020:
Feel free to copy this line to webCoRE’s clipboard, so you will always have a one click voice alert.

Basically, any PUSH notification that begins with ®, will have the rest of the notification read out loud. Using webCoRE variables is a brilliant way to get real data into the voice alert. For example, if I:
Send Push Notification "® The time is "$time". It's "currentOutsideTemp", and "currentWeatherString" outdoors. "hiLoString" It is a comfortable "motionTemp"° inside."
My speaker would say something like:
“The time is 4:00 P.M. It’s 79 degrees and Partly Cloudy outdoors. Tonight’s low is 50 degrees. It is a comfortable 73 degrees inside.”
For advanced users, if you are using two speakers like I mentioned at the beginning (one Alexa Echo, and one speaker nearby connected to the Android), then you can have webCoRE control Alexa Echo, simply by doing something like this:
Send Push Notification "{"® A lexa, what's on my calendar?"}"
Send Push Notification "{"® A lexa, play Pink Floyd on Spotify"}"
Send Push Notification "{"® A lexa, set timer for 2 hours"}"
Send Push Notification "{"® A lexa, what's my flash briefing?"}"
(Or any other invocation for any of her Skills)
The space I put in "A lexa" above seems to work best for my TTS voice to be understood, but feel free to experiment.
The reason that 2 speakers are required for this ability, is because Alexa (like humans) cannot talk and listen at the same time. The “talking” speaker has to give commands to the “listening” Echo.
One great example, in my “go to bed routine” in webCoRE, it turns off lights, tells me the weather forecast for the next 8 hours etc… but my favorite part is a vocal command, “A lexa, open Babbling Brook” … it pauses for a few seconds, then says, “A lexa, turn off in 30 minutes”. This gives me a nice peaceful sound to fall asleep to.
This is a great way to run Alexa skills (commands) using webCoRE!
(set reminders, read the news, play Spotify playlist, etc)
By the way, for those interested, most of the “babbling brook” sound effects are lame in Alexa,
but this one sounds really good:

Edit Oct 2020
For new installs, the steps above are perfect…
… but for those going from the ST Classic app to the new app:
Click here to see what changes you'll need to do
In the Profile trigger, change to:
- Notification Title: My home
- Package Name: com.samsung.android.oneconnect
In the Task, change to:
- Line 1 = Title: My home
- Line 5 = Notification Title: My home
For reference, (or for those still using SmartThings Classic), previously it was:
- Notification Title: SmartThings
- Package Name: com.smartthings.android

